It's finally time to grout!! ...Which means I am ONE STEP closer to being finished in the kitchen!
First, gather all of your supplies. You will need:
- grout (I used TEC Skill Set 12.5-lb Universal Sanded/Unsanded Powder Grout $12.48 for a 12.5lb bag)
- grout color (821 Chromium TEC Color: Uses #07 and #01 for the color mix. Here is a link of their color selection).
- Grout Boost (definitely worth the $27.48. You NEVER have to seal your grout).
- grout float
- sponge
- grout colored caulk (I used 949 Silverado silicone caulk. I couldn't find the Chromium color but was pretty close to perfect)!
- grout mixer (more on that later)
- drill
- bucket
- painters tape
I went by the instructions on the grout bag. It is very important to follow these steps precisely. You start by mixing your colors first. Alternate wet (Grout Boost) and dry (grout color) mixing thoroughly before you add more grout color.
The directions on the bag say to use water. *You DO NOT use water if you are using the Grout Boost. This is the substitute for the water.* Don't use all of your Grout Boost for mixing the color. You will need to use this to alternate wet & dry for the grout itself.
Stir, stir, stir!! Don't add your grout to the mix until your color is thoroughly blended.
Once your color is mixed, alternate wet (Grout Boost) and dry (grout) to the mix.
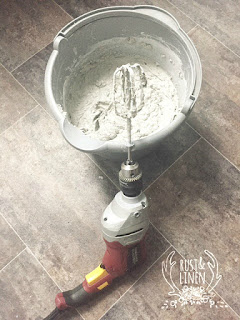
In the supplies list I mentioned that you needed a grout mixer attachment for your drill. I thought I could alternate my wet & dry well enough that I wouldn't need a grout mixer. WRONG! My arms were so sore from mixing and stirring!! Not to mention my paint stirrers weren't sturdy enough to mix the heavy mixture and broke. Since I had already started on mixing the grout, there was no turning back. I had to figure out something to mix with or this grout (& expensive grout boost) could be trashed. The grout mixer looks like a hand held mixer's beaters. I rummaged through a box labeled "kitchen" and found my beaters. I don't bake that often ever, so I figured this would be a better use for these fellas. I loaded one into the drill and VOILA! Another improvisation for our Redneck 101 class!
It worked like a champ and got all of my color and grout blended successfully!
Follow instructions per the grout bag once your grout is mixed(it says to let sit for a few minutes). While you are letting the grout sit, tape off any areas that will come into contact with the grout that you want protected. I taped off my counter tops and cabinets that were next to the tile. The grout is very sandy and will scuff your counters and cabinets if you're not careful.
Once your time to wait is up, take your grout float and begin pressing and smearing a healthy dollop of grout onto your tile. Be sure to press (smush) the grout into those lines & wipe away with float at a 45° angle.
Don't have a heart attack when you realize what a big mess you are making... It's ok for it to look like this: (scary!)
Let your grout stay like this for about 5-10 minutes (depends on drying time). You want to be able to press the grout and it feel firm, not hard/dry, not wet/mushy. *Not allowing the grout to over dry is very important. If it completely dries, there's no coming off! Don't go based on time to check to see if it's dry. Test with your fingers.* Once it is firm to the touch, take your damp sponge and begin to wipe away your excess grout. Don't rinse your sponge in the sink as it could cause a clog. Use a bucket/large bowl of water to rinse your sponge.
Keep this up: damp sponge, wipe, rinse, repeat until the excess grout has been removed. There will be a haze on the tiles. Don't worry. You can go back with a damp paper towel after the grout is dry to bring your tiles to a marvelous shine!
Clean any drips of grout from your counter tops and floor as soon as you can to prevent them from drying.
Allow 24-48 hours for the grout to dry before caulking. After the grout is dry, remove the painters tape that you had for grouting & clean any loose grout from the seam. You want to add fresh tape to use as a guide for the caulk.
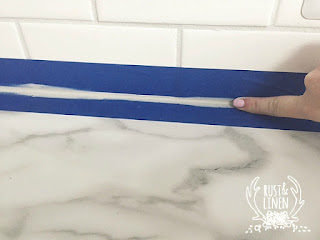
Tape the tile and the counter top leaving a gap for the caulk. Be sure your gap is the same from one end to the other. You don't want crooked lines :)
When I cut my tube of caulk (always at an angle) and inserted it into the caulk gun, clear silicone came out first. Take a paper towel and squeeze some caulk until you get to your color.
Begin at one end and squeeze a good line of caulk. It's ok if it looks messy at this point.
After you have applied the caulk, use your finger to wipe a clean line down the entire line. You will have to take breaks to clean your finger. Make sure that when you start and stop, you have a smooth transition.
Allow a few minutes for your caulk to set. You want to remove the tape while the caulk is still damp so you can make any corrections as needed.
Pull the tape slowly away. Be careful not to get the wet caulk from the tape onto you or anything else.
You now have perfect caulk lines that blend perfectly with your grout!
Here's the current status of our kitchen (lacks window seal, trim, chimney hood, crown moulding, caulk against cabinets, receptacle covers, drawer pulls and paint touch-ups):


Love this look. I am using colonial white granite. Kinda wish I had used quartz but they are installing this week so I am going to have to stop stressing. Can you tell me the paint color. Painters are are starting to paint tomorrow. Thank you for such a wonderful post.
ReplyDeleteThey are providing lots of free stuff including Rust skins!
ReplyDeleteYou can find there lot's of free stuff like free Rust skins and many more!
Myself and my husband had been trying to get pregnant for 18 months before I was referred to Priest Babaka fertility solution. We had no definite diagnosis of what was wrong and had become very frustrated. In November 2017 I was given a thorough reproductive health work up, I found out I had low progesterone, thyroid issues and a stomach issue which was affecting my ability to get pregnant. This was a very thorough process involving dietary, hormonal and physical investigations and started the recommended treatments in Feb 16 2018 by Priest Babaka. I was pregnant by April 17. I had a baby boy in march 2019. I was carefully monitored and Priest Babaka was always available for me. I can recommend Priest Babaka more highly so much so we are hoping to start trying for a second baby under his guidance. email: babaka.wolf@gmail.com or Facebook at priest.babaka
ReplyDeleteMyself and my husband had been trying to get pregnant for 18 months before I was referred to Priest Babaka fertility solution. We had no definite diagnosis of what was wrong and had become very frustrated. In November 2017 I was given a thorough reproductive health work up, I found out I had low progesterone, thyroid issues and a stomach issue which was affecting my ability to get pregnant. This was a very thorough process involving dietary, hormonal and physical investigations and started the recommended treatments in Feb 16 2018 by Priest Babaka. I was pregnant by April 17. I had a baby boy in march 2019. I was carefully monitored and Priest Babaka was always available for me. I can recommend Priest Babaka more highly so much so we are hoping to start trying for a second baby under his guidance. email: babaka.wolf@gmail.com or Facebook at priest.babaka