Thursday, January 29, 2015

Chalkboards

I LOVE doing chalkboards. My secret is finding fonts I like on the computer and free-handing or using my projector to transfer the fonts.

This is drawn with chalk markers on a chalkboard.
(markers and chalkboard found at Hobby Lobby. I glued a bow to dress it up)


These are drawn on black foam board and painted with chalk pens.


Chalk markers on a chalkboard:


The "Smile from Ear to Ear" is white chalk (real chalk) drawn on a chalkboard.

*HINT: If you allow the chalk markers to sit on the chalkboard for an extended period of time, a "shadow" of your writing will still be evident even after you erase the marker. What I did on the "Smile from Ear to Ear" chalkboard was repaint with "Rust-Oleum's Chalkboard paint."


You can buy it at Lowe's, Home Depot, Hobby Lobby, etc. This was the same chalkboard used for Colt's first birthday. We could still see his "facts" from last year, so I repainted and drew over it with a new design.

The log slice was purchased at Hobby Lobby. I painted it with Rustoleum's Chalkboard Paint® (above) and wrote a sweet and powerful Bible verse with a chalk marker. 


Chalkboards are a great way to explore your creativity! You basically can't mess up! It's easy to erase and start over as many times as you need to.


Wednesday, January 28, 2015

Kitchen, dining room and living room renovation progress...

Our kitchen and dining room renovations began before the major renovation on the exterior. When we purchased the house, tan carpet, pink walls and heavy drapes described our living space.


(I see that our fur babies didn't put their toys up)

Since then, we have painted the living room and dining room "Stormy Weather" by Olympic at Lowe's and tore out the carpet. Can I just say how much I love to tear something out to find a hidden treasure?!? Original hardwood floors (in good condition, might I add) laid beneath that worn carpet. We waxed the floors with SC Johnson "One Step Floor Wax" for $7.48 at Lowe's and it made the biggest difference!


I was excited to find this rug from Rugs USA (Homespun Trellis HK85) and my $50 coffee table from TJ MAXX...score!! Don't judge the furniture. I am in the process of recovering a tufted linen covered sofa in dropcloth and working on two side chairs. Those tutorials will be coming soon!


Back to the kitchen and dining room... The kitchen was cute and retro before, but it wasn't very functional for our needs. AKA, NO dishwasher!!
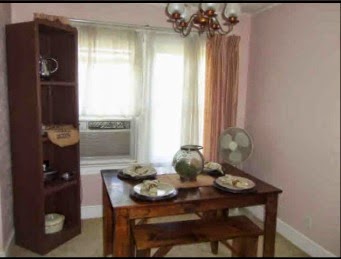
Before photos:


Dining room before (notice the window unit. We now have HVAC!! Thank goodness in this south Alabama heat!)


The "before" photo of the dining room AFTER we have painted, torn out the carpet and replaced the lighting:


Now for the fun part! We tore out the cabinets and sheetrock to find no insulation and deteriorated wiring. All of the electrical had to be replaced...not the fun part. Thankfully, we were able to do all of the rewiring, which saved us a TON of money.


Then we tore out the wall between the kitchen and dining room to really open up the space.


View from dining room:


Our contractor took over from that point. New insulation and sheetrock were installed & a new door was installed.

These kitchen windows were replaced with a more convenient entry for guests 
(see that rot?!? YIKES!):


After:


There were 3 doors from the end of the house to the archway at the end of the dining room. One door was the entrance from the mudroom (we kept that one), one was a second entrance into our master bedroom (that one had to go to make room for more kitchen cabinets), and a second doorway into the hallway (also had to go). There is another hallway door just on the other side of the archway. Now we only have one door on that wall and plenty of space for kitchen and dining storage!


I am so ready to start putting the finishing touches on (aka the "jewelry").

Our countertops are Formica 180FX in "Calacatta Marble".


The cabinets are Acadia from Lowe's. It's a white shaker style cabinet which is EXACTLY what I wanted. Turns out, this is one of the most inexpensive cabinet choices at Lowe's! The flooring is IVC Challenger 993 Stone Low-Gloss Finish Sheet Vinyl from Lowe's.


I can't wait to post the final product!! Here are more beauties that will be featured:


SO STAYED TUNED!!


Tuesday, January 27, 2015

Exterior renovation progress

So, I have waited to post any progress pictures on our current renovation (and been WAAY busy lately). I wanted to wait to post the grand reveal, but progress is taking longer than expected. That's surprising, right? Renovations ALWAYS go according to budget and timeline, right? :)
I'll start with the progression of our house from the very beginning. This is the original home built in 1950. The owner at that time used lumber cut from the property to build the house. That is amazing and makes the home much more special to us!

Fast forward to when we bought the house in 2013. This is how we purchased the home. You can see both screened in porches were enclosed at some point and an addition built on the right side.
The side of the house with the windows is one of the converted porches. It is used as our laundry room. The interior was exposed studs with a screen door for the entrance. Needless to say, it was COLD doing laundry in the winter and SWELTERING in the summer.

It was very unflattering (for me since I am unorganized and chaotic) to have guests enter through our laundry room. Needless to say, I wanted an entry door in the kitchen. This is my inspiration picture for the kitchen entrance:
(image source: http://shannonberrey.com/_blog/Shannon_Berrey_Design_Blog/page/109/">

We hired Doug Salter Construction to do the big stuff. We did all of the tear out and demo work. We will also paint, install flooring and cabinets. Yes, I am a bit frugal!! I like to stretch my dollar until you can see through it. HA! Doug and his crew relocated the existing kitchen window to the mudroom. They replaced those kitchen windows with a new door. See the transformation below:

New kitchen door:


New window installed and framed in mudroom:
(yes my dryer is turquoise. I painted the washer and dryer to match...then the washer died. Painting appliance tutorial to come!)

Windows and door in place and house wrapped:
I really like the craftsman style exterior with lots of different textures. We decided to go with hardie (James Hardie) board and batten. The rest of our house is asbestos shingles. We knew we had to do a different siding, so why not mix it up?

I absolutely LOVE how my new side porch turned out!! It is exactly as I had envisioned with my inspiration picture. We are going to paint the house "Wood Smoke" by Glidden. I will also plant a slender evergreen or tree of some sort to cover the utility boxes near the door.


Our front porch started out as an aluminum canopy. I wanted a bigger statement piece like this:
(image source the Chastain Ranch in Atlanta)

Before:
Progress:
I am very excited on the progress!! I cannot wait to see the final product!

More to come... accessories: