Tuesday, July 7, 2020

Farmhouse Bathroom Makeover


Ah! It feels great to be back. So much has changed since my last post. So many changes in our lives took me away from blogging. I returned to school and obtained my teaching certificate. I now teach elementary school and love it! It allows me time with my kids (my two girls Ada & Everly), hobbies and hubby. For sure, this school year has been all but normal #coronavirus. I have spent a lot of time on Pinterest and Instagram and decided to get back into my groove. I thought a great first post back would be to show our bathroom remodel. Wahoo!!

Just a refresher, we bought our home that was built in the 50s. We gutted most of it and designed it in an aesthetic that fit our needs and wants. The house has 2 bathrooms. This one we are discussing now and also a small en suite in the master bedroom. Needless to say, this bathroom is the MOST USED room of the house in a family of four. It had a pedestal sink, toilet and shower/tub combo. There was hardly any storage. Here is what I am talking about...


Niiiceee, right? 😜 I should also state that this picture happened after we tore out the floor. There was a linoleum floor that was on top of a blue linoleum floor (you can kind of see that part here). You get the idea. First things first, we moved the toilet next to the tub and moved the *vanity* to the corner where the toilet once was. Having a pier foundation house made moving the plumbing MUCH easier. The walls also had a sheet covering that we removed. 

Fast forward to the final product:


The vanity was a one-piece purchase that made installation a lot easier. We chose the Lamport Vanity with stone countertop from Home Depot (here). 

I chose a beaded mirror (similar here) that is 36' x 24".

  We installed our flooring in 2015, and it is still holding up FANTASTICALLY. We did our renovation on a budget...as usual. I chose this TrafficMASTER Carrara Marble stick tiles (here). We have had no issues thus far. 

The most cost-saving choice we made was on the shiplap. I chose to go with plywood and had it cut to 6" planks. Lowe's cut the planks in store for no charge. To install, we used liquid nails and a pneumatic nail gun with small finishing nails. We used nickels for spacers. I was concerned with durability being in the bathroom...humidity and all. This was installed in 2015 and looks the same as it did when we installed it. We also updated the tub surround, knobs and faucet, but I'll save that for another post. 😉

I'd love to connect with you! Let me know if you have questions. 


Thursday, April 7, 2016

DIY African JUJU Hat Tutorial


I have been holding onto this project for quite sometime and finally got motivated enough to begin over the weekend. I don't know what I was waiting for because it was super easy (with the right supplies) and only took about an hour to finish. My kind of project!! Anyway, I had searched high and low for the perfect tutorial online, but I couldn't find exactly what I was looking for. The most helpful tutorial was from Hollie at Vintage Farm. Like Hollie's tutorial, most tutorials used poster board as the support material. I will go ahead and put this disclaimer in: this is a cheaper version of an authentic juju hat, but not a CHEAP project. The feathers are quite expensive (if you are frugal like me), so I did not want to glue to poster board that could fail over time. I found the perfect support piece at Target and happened to get it discounted because it was broken (that part didn't matter because I was going to cut it down to size anyway). 

Here are some of my inspiration juju hats I found online:

Source: Houzz

Source: White Cabana

Authentic juju hats run anywhere from $235-$400. This project cost less than $120. Like I said, not a cheap DIY, but a cheaper version of an authentic hat. 

Supplies:

  • Support piece (about 18" in diameter. Mine is from Target).
  • Feathers: I used Rooster Coque Tails from the Feather Place (7-10 inches, Type: CCNSD, color: beige, quantity: 2) for $99.40
  • Tools to cut your support piece. (I used a handheld grinder and snips)
  • Hot glue gun
  • Tape measure
  • Scissors

This is my support piece I got from Target. It is 30" diameter. You can see the damaged section, but I cut that part off. The original price was $39.99, but I got it for $20 due to the damage.


I cut most all of the woven pieces with the snips, but found it had wire supports as well. Drew used the handheld grinder to cut those pieces for me. 


My diameter was about 18" after it was cut. This will create about a 30" finished juju hat. 


Before I got started, I laid out my feathers to make sure of the length and placement. I did not want to be short! 


Once you determine the best placement for your feathers, begin securing with hot glue. I glued my feathers to curve inwards. I felt this gave it the most authentic look. 


I measured and cut the section that was lacking. I did not want to overlap the feathers. 


Before gluing your next row, lay out feathers to get the correct spacing you desire. Again, you do not want to run out of feathers!


Once you determine the placement, glue your feathers as you did for the first row. *It is better to have left over sections of feathers. You can go back and add where needed.*


I cut small sections to fill the center. They didn't curve well as a connected strip. 


Filling the middle was the most difficult part to me. I trimmed the long feathers to make shorter, fuller feathers. Glue them around to fill any voids. 


There you have it! A finished faux African juju hat. There was already a hanging loop on the back of my support piece from Target. 


It is currently hanging above Ada Morgan's crib, but it will soon find a new home over our bed to make room for her wooden monogram. 


Monday, January 25, 2016

Our infertility journey has ended!!

We are nearing the final touch ups so renovation updates will be posted soon. We have a bit more motivation now that we found out our family is growing by two feet in April 2016! Holy smokes, we were shocked. I had just posted a blog entry in May about our infertility struggle (here). Our journey is one that is definitely extra-ordinary. After years (YEARS!!) of trying, several tests, monthly bloodwork (which I pass out nearly every time I get poked), surgery in December of 2014, rounds of Clomid, failed IUIs...whew. Finally, when we had an overwhelming sense of peace after my blog entry in May, we decided to not further our infertility journey. By that, I mean, we would not proceed to in vitro fertilization (test tube babies). We had strong convictions about taking things from God's hands into our own. While I know that is extreme, and He gives doctors the knowledge to perform life's little miracle, we felt a personal conviction to decline in vitro at this time. We still took the vitamins and Clomid, but we were taking a break from the bloodwork and doctor's visits. While we had always prayed for a child, that had become our focus. This time, our prayer was different. It was a greatfulness and thankfulness for the togetherness that our God had created for Drew and I.

...Fast forward to August 26, 2015. I was sitting at work and felt a stinging sensation on my right side. I went to the bathroom to find a large red area with what appeared to be bite marks. I went to the walk-in clinic after work only because I feared it was a spider bite and it was rapidly getting darker in the center of the redness. As I was waiting in the exam room, I pulled open my Fertility Friend app (the app I still used to chart my cycles) because I knew the nurse would be asking me the all too familiar "when was your last cycle" question before administering any medications. As I sat there looking at my app, I noticed I was almost two weeks late. You have to understand, at this point in our infertility journey, two weeks late no longer stirs any sort of hopeful or excited emotion.  Anyway, the nurse asked the question and immediately asked if there was a chance I was pregnant when I told her I was late. I genuinely laughed and replied, "no ma'am, unfortunately not." The nurse practitioner did prescribe pregnancy-safe medications in the event I "could" be. Again, still no hope or excitement.

As I waited at the pharmacy for my medications, I decided to pick up yet another box of pregnancy tests. No biggy... I've only used about 1,000,000,000 tests in the 6 years we have been married. I was merely out of my stock. I got home and decided to go ahead and test. I am so used to using these HPT that I laid it down and went to the kitchen to take my prescription for the spider bite. I went back to check the test about 10 minutes later to find... two pink lines!!!!

I burst into hysterical laughter and uncontrollable sobbing. I am pretty sure I displayed all of the symptoms of a looney person! I mean, who knew pregnancy tests actually displayed two lines?! I immediately ran and got the other test (bottom pictured) and used it. TMI, but I literally had no "tinkle" left. I only got a few drops and thought, "oh well, maybe I can reuse it tomorrow." I ran to the kitchen to get my phone to text Drew. Since it was Wednesday night he was at church (where I should've been but missed because of the earlier doctor's visit). Of course, he wouldn't answer!! My text simply said "What are you doing?" I told you...looney person. I knew what he was doing, but I just needed to talk to him!! I went back to the bathroom to find my second test with only a few drops was ALSO positive..... Insert mass hysteria again. 


At this point my hysterical laughter combined with racking sobs was overcome with only the racking sobs. I hit my knees in prayer and prayed the most fervent prayer I have ever spoken. I cried and spoke my prayer aloud talking to my Father as if He was standing right in front of me. I have never been so overwhelmed by a simple emotion in my life. I ended my prayer of thanksgiving by laughing and telling God "you have one sense of humor." I knew that a two positive tests were only the beginning, but the fact that it said pregnant instilled a hope and joy I have never felt.  

Drew had finally texted me back and replied that he was at church...duh. HAHA. I asked him when he would be home. Again, dumb question, but I was crazy. I ran to my closet and grabbed a onesie that I had purchased a while back that says "Worth the Wait." I threw it in a gift bag with the two tests and waited.... 


I couldn't sit still, so I ran outside. Just pacing, waiting on Drew to text back. I almost stepped on a snake walking around like a crazy person and determined it needed to die as it was in my way. I know, crazy person. So at this point I have cried, laughed, prayed, random texted...and killed a snake. I finally sat on the porch with my gift bag and cell phone, waiting on Drew. I texted him that I needed him to come home as soon as church is out. Of course, he thinks something is wrong and replies "why, is everything ok?" I laugh and think just wait!! :) He pulls into the yard, and I run to him and give him the gift bag through his truck window. He looked at me as if I were crazy because all of this urgent texting was for...a gift. He pulls out the onesie first but doesn't yet read it. He says "this is NOT going to fit me." He realizes what it is and immediately looks further into the bag to see the two tests. He says "this is not real...is it?" I just smile and start to cry again. With joyful tears in his eyes, he wraps his arms around me and says "what now?" I told him we have to go see our parents...now. It is almost 7:30pm, and I knew it was getting late, but I couldn't contain myself. He asked all of the normal questions, "are you sure," "is it too early to tell people," "can this be real?" 

Since Drew's mom's birthday was the day before, I asked her could we come bring her her birthday present. She said "yes" and never got suspicious. I re-wrapped the "gift" and we headed to the in-laws' house 4 miles away. We give his mom her gift and she thinks we got her Mary Kay eye cream. Um no Mom, don't put those under your eyes!! haha. She then realized it was HPTs, NOT eye cream. She cried and clapped which caused Drew's dad to come see the commotion. He said "Well, looks like we are getting another bambino." A good man of few words. :)

I ask his mom if I can kindly take back "her gift" because I need to go re-gift it to my parents. She gladly obliged, and couldn't wait to get started scrap-booking. 

I texted my mom and dad and said I needed to meet them in Dothan, which is about an hour from me and 30 minutes from them. They immediately think something is up, but I tell them that we got a new puppy, and I needed them to see it (they don't buy it but oh well). Anyway, we meet up and my mom screamed and laughed and cried (I guess I get my crazy emotions from her), and I was pretty sure that the hospital's security team (where we met up) would be dispatched thinking someone was getting mugged. 


(I failed at doing the weekly picture thing, but at least I got one for the beginning) haha


Anyway, we are now 27 weeks and get to see the 4D picture of our little girl, Ada Morgan, this coming Friday. Time has flown and not only are we in the process of our home renovation, but we also had to design/decorate a nursery. We have made great progress so those pictures will be up soon. Here is a great ending to this LOOONG entry:


Friday, December 25, 2015

Exterior at Christmas


I slacked with the exterior Christmas decorations this year due to our trip to NYC right before Christmas. This is the completed paint and exterior renovation decorated for Christmas (minus my wind-blown wreath on the far left). At this time, we aren't going to install shutters. In the future I would like to have custom wooden craftsman style shutters added with hardware.

As for this year, a few spotlights and wreaths will have to do for the exterior Christmas decor! :)


Sunday, November 22, 2015

Exterior paint progress


WOW...it's been a while since I have last written anything. That doesn't mean that nothing has happened since July. It's actually the opposite! After I posted our infertility journey of 4 years (here) back in May, Drew and I have found out we are pregnant! I have a TON to post such as our gender reveal party when we found out it is a little girl! Ada Morgan Donaldson will be here April 28(ish), 2016. We are so excited and overwhelmed! Needless to say, that means I have to get the renovation in gear and finished.

Finally, I bit the bullet and hired a painter. Ya'll all know how much I hate to spend money on things that I feel like I can do. Well, now that has ALL changed when you find out you are pregnant and on a tight timeline.

Since it has been a while, I will refresh your memory with the before picture of our house when we purchased it back in 2013.

(front)

(side)

Here is the next phase where we added the front porch and side entry with a porch:


See those progress posts here and here

We have been at a standstill on the exterior for about 6 months...yikes!! The inside has also suffered a delay, but we are rapidly making finishing touches. Those updates will be posted soon. So basically, the exterior hasn't changed much until now. I hired a painter based off of a referral and he is perfection!! He has exceeded my expectations and done so in a quick time frame. So if you are in the South Alabama area, call Ed with Edison Painting!

We he painted the outside with a coat of Sherwin Williams Duration exterior paint with a satin finish. The color is a custom blend that I found from The Space Between. Here is the color blend: Exterior Superior Performance Ultra White 6404-13761 ColorCode BAC colorant OZ 32 64 128 B-1 Black - 43 R-2 maroon - 02 - 1 Y3 Deep gold - 30 - - W1 white 2 - - - R4 New red - - - 1 1 gal, ultra white A89W 01151. The closest paint chip is Wood Smoke by Glidden. 

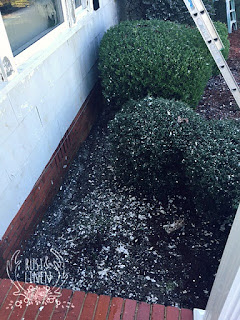
The painter first pressure washed the house with a turbo tip commercial power washer. He successfully managed to blow off almost all of the old (lead) chipping paint. Also, while doing so, he blew off pieces of the asbestos siding that was previously cracked and blew a hole in the vinyl soffit. All of that is to be expected, and he repaired all of the damages. Even damages he didn't cause. Like I said, PERFECTION! 


(you can see the holes in the vinyl soffit above)


This is about the closest we will get to snow in South Alabama haha!

After he pressure washed and made the necessary repairs, he caulked all of the new siding, windows, trim and repairs. Then, he primed the areas that were bare siding. Lastly, he painted the body of the house with a sprayer. He told me it would only take 8-10 gallons of paint to do the entire house. 

Drake is proudly posing in the front :)


Finally, he is putting on the mascara (aka, painting the trim). And boy does it make a difference!! See below:


He looks almost finished, and just in time for Christmas decorating!! I can't wait! I asked him not to install the old vinyl shutters because I am going to get some wooden craftsman style shutters to complete the look. 

Stayed tuned for an overload of more progress pics soon (& baby Ada news)! 


Tuesday, June 30, 2015

Installing subway tile PART 2: Grout

It's finally time to grout!! ...Which means I am ONE STEP closer to being finished in the kitchen! 


First, gather all of your supplies. You will need:


I went by the instructions on the grout bag. It is very important to follow these steps precisely. You start by mixing your colors first. Alternate wet (Grout Boost) and dry (grout color) mixing thoroughly before you add more grout color.


The directions on the bag say to use water. *You DO NOT use water if you are using the Grout Boost. This is the substitute for the water.* Don't use all of your Grout Boost for mixing the color. You will need to use this to alternate wet & dry for the grout itself.


Stir, stir, stir!! Don't add your grout to the mix until your color is thoroughly blended.


Once your color is mixed, alternate wet (Grout Boost) and dry (grout) to the mix. 

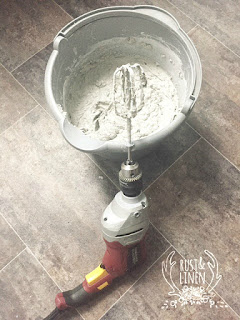
In the supplies list I mentioned that you needed a grout mixer attachment for your drill. I thought I could alternate my wet & dry well enough that I wouldn't need a grout mixer. WRONG! My arms were so sore from mixing and stirring!! Not to mention my paint stirrers weren't sturdy enough to mix the heavy mixture and broke. Since I had already started on mixing the grout, there was no turning back. I had to figure out something to mix with or this grout (& expensive grout boost) could be trashed. The grout mixer looks like a hand held mixer's beaters. I rummaged through a box labeled "kitchen" and found my beaters. I don't bake that often ever, so I figured this would be a better use for these fellas. I loaded one into the drill and VOILA! Another improvisation for our Redneck 101 class! 


It worked like a champ and got all of my color and grout blended successfully!

Follow instructions per the grout bag once your grout is mixed(it says to let sit for a few minutes). While you are letting the grout sit, tape off any areas that will come into contact with the grout that you want protected. I taped off my counter tops and cabinets that were next to the tile. The grout is very sandy and will scuff your counters and cabinets if you're not careful.


Once your time to wait is up, take your grout float and begin pressing and smearing a healthy dollop of grout onto your tile. Be sure to press (smush) the grout into those lines & wipe away with float at a 45° angle.


Don't have a heart attack when you realize what a big mess you are making... It's ok for it to look like this: (scary!)


Let your grout stay like this for about 5-10 minutes (depends on drying time). You want to be able to press the grout and it feel firm, not hard/dry, not wet/mushy. *Not allowing the grout to over dry is very important. If it completely dries, there's no coming off! Don't go based on time to check to see if it's dry. Test with your fingers.* Once it is firm to the touch, take your damp sponge and begin to wipe away your excess grout. Don't rinse your sponge in the sink as it could cause a clog. Use a bucket/large bowl of water to rinse your sponge. 


Keep this up: damp sponge, wipe, rinse, repeat until the excess grout has been removed. There will be a haze on the tiles. Don't worry. You can go back with a damp paper towel after the grout is dry to bring your tiles to a marvelous shine!


Clean any drips of grout from your counter tops and floor as soon as you can to prevent them from drying.

Allow 24-48 hours for the grout to dry before caulking. After the grout is dry, remove the painters tape that you had for grouting & clean any loose grout from the seam. You want to add fresh tape to use as a guide for the caulk.


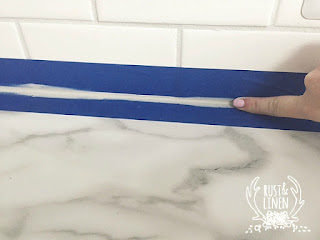
Tape the tile and the counter top leaving a gap for the caulk. Be sure your gap is the same from one end to the other. You don't want crooked lines :)


When I cut my tube of caulk (always at an angle) and inserted it into the caulk gun, clear silicone came out first. Take a paper towel and squeeze some caulk until you get to your color.

Begin at one end and squeeze a good line of caulk. It's ok if it looks messy at this point.


After you have applied the caulk, use your finger to wipe a clean line down the entire line. You will have to take breaks to clean your finger. Make sure that when you start and stop, you have a smooth transition.


Allow a few minutes for your caulk to set. You want to remove the tape while the caulk is still damp so you can make any corrections as needed.

Pull the tape slowly away. Be careful not to get the wet caulk from the tape onto you or anything else.


You now have perfect caulk lines that blend perfectly with your grout!


Here's the current status of our kitchen (lacks window seal, trim, chimney hood, crown moulding, caulk against cabinets, receptacle covers, drawer pulls and paint touch-ups):