Sunday, November 22, 2015

Exterior paint progress


WOW...it's been a while since I have last written anything. That doesn't mean that nothing has happened since July. It's actually the opposite! After I posted our infertility journey of 4 years (here) back in May, Drew and I have found out we are pregnant! I have a TON to post such as our gender reveal party when we found out it is a little girl! Ada Morgan Donaldson will be here April 28(ish), 2016. We are so excited and overwhelmed! Needless to say, that means I have to get the renovation in gear and finished.

Finally, I bit the bullet and hired a painter. Ya'll all know how much I hate to spend money on things that I feel like I can do. Well, now that has ALL changed when you find out you are pregnant and on a tight timeline.

Since it has been a while, I will refresh your memory with the before picture of our house when we purchased it back in 2013.

(front)

(side)

Here is the next phase where we added the front porch and side entry with a porch:


See those progress posts here and here

We have been at a standstill on the exterior for about 6 months...yikes!! The inside has also suffered a delay, but we are rapidly making finishing touches. Those updates will be posted soon. So basically, the exterior hasn't changed much until now. I hired a painter based off of a referral and he is perfection!! He has exceeded my expectations and done so in a quick time frame. So if you are in the South Alabama area, call Ed with Edison Painting!

We he painted the outside with a coat of Sherwin Williams Duration exterior paint with a satin finish. The color is a custom blend that I found from The Space Between. Here is the color blend: Exterior Superior Performance Ultra White 6404-13761 ColorCode BAC colorant OZ 32 64 128 B-1 Black - 43 R-2 maroon - 02 - 1 Y3 Deep gold - 30 - - W1 white 2 - - - R4 New red - - - 1 1 gal, ultra white A89W 01151. The closest paint chip is Wood Smoke by Glidden. 

The painter first pressure washed the house with a turbo tip commercial power washer. He successfully managed to blow off almost all of the old (lead) chipping paint. Also, while doing so, he blew off pieces of the asbestos siding that was previously cracked and blew a hole in the vinyl soffit. All of that is to be expected, and he repaired all of the damages. Even damages he didn't cause. Like I said, PERFECTION! 


(you can see the holes in the vinyl soffit above)


This is about the closest we will get to snow in South Alabama haha!

After he pressure washed and made the necessary repairs, he caulked all of the new siding, windows, trim and repairs. Then, he primed the areas that were bare siding. Lastly, he painted the body of the house with a sprayer. He told me it would only take 8-10 gallons of paint to do the entire house. 

Drake is proudly posing in the front :)


Finally, he is putting on the mascara (aka, painting the trim). And boy does it make a difference!! See below:


He looks almost finished, and just in time for Christmas decorating!! I can't wait! I asked him not to install the old vinyl shutters because I am going to get some wooden craftsman style shutters to complete the look. 

Stayed tuned for an overload of more progress pics soon (& baby Ada news)! 


Tuesday, June 30, 2015

Installing subway tile PART 2: Grout

It's finally time to grout!! ...Which means I am ONE STEP closer to being finished in the kitchen! 


First, gather all of your supplies. You will need:


I went by the instructions on the grout bag. It is very important to follow these steps precisely. You start by mixing your colors first. Alternate wet (Grout Boost) and dry (grout color) mixing thoroughly before you add more grout color.


The directions on the bag say to use water. *You DO NOT use water if you are using the Grout Boost. This is the substitute for the water.* Don't use all of your Grout Boost for mixing the color. You will need to use this to alternate wet & dry for the grout itself.


Stir, stir, stir!! Don't add your grout to the mix until your color is thoroughly blended.


Once your color is mixed, alternate wet (Grout Boost) and dry (grout) to the mix. 

In the supplies list I mentioned that you needed a grout mixer attachment for your drill. I thought I could alternate my wet & dry well enough that I wouldn't need a grout mixer. WRONG! My arms were so sore from mixing and stirring!! Not to mention my paint stirrers weren't sturdy enough to mix the heavy mixture and broke. Since I had already started on mixing the grout, there was no turning back. I had to figure out something to mix with or this grout (& expensive grout boost) could be trashed. The grout mixer looks like a hand held mixer's beaters. I rummaged through a box labeled "kitchen" and found my beaters. I don't bake that often ever, so I figured this would be a better use for these fellas. I loaded one into the drill and VOILA! Another improvisation for our Redneck 101 class! 


It worked like a champ and got all of my color and grout blended successfully!

Follow instructions per the grout bag once your grout is mixed(it says to let sit for a few minutes). While you are letting the grout sit, tape off any areas that will come into contact with the grout that you want protected. I taped off my counter tops and cabinets that were next to the tile. The grout is very sandy and will scuff your counters and cabinets if you're not careful.


Once your time to wait is up, take your grout float and begin pressing and smearing a healthy dollop of grout onto your tile. Be sure to press (smush) the grout into those lines & wipe away with float at a 45° angle.


Don't have a heart attack when you realize what a big mess you are making... It's ok for it to look like this: (scary!)


Let your grout stay like this for about 5-10 minutes (depends on drying time). You want to be able to press the grout and it feel firm, not hard/dry, not wet/mushy. *Not allowing the grout to over dry is very important. If it completely dries, there's no coming off! Don't go based on time to check to see if it's dry. Test with your fingers.* Once it is firm to the touch, take your damp sponge and begin to wipe away your excess grout. Don't rinse your sponge in the sink as it could cause a clog. Use a bucket/large bowl of water to rinse your sponge. 


Keep this up: damp sponge, wipe, rinse, repeat until the excess grout has been removed. There will be a haze on the tiles. Don't worry. You can go back with a damp paper towel after the grout is dry to bring your tiles to a marvelous shine!


Clean any drips of grout from your counter tops and floor as soon as you can to prevent them from drying.

Allow 24-48 hours for the grout to dry before caulking. After the grout is dry, remove the painters tape that you had for grouting & clean any loose grout from the seam. You want to add fresh tape to use as a guide for the caulk.


Tape the tile and the counter top leaving a gap for the caulk. Be sure your gap is the same from one end to the other. You don't want crooked lines :)


When I cut my tube of caulk (always at an angle) and inserted it into the caulk gun, clear silicone came out first. Take a paper towel and squeeze some caulk until you get to your color.

Begin at one end and squeeze a good line of caulk. It's ok if it looks messy at this point.


After you have applied the caulk, use your finger to wipe a clean line down the entire line. You will have to take breaks to clean your finger. Make sure that when you start and stop, you have a smooth transition.


Allow a few minutes for your caulk to set. You want to remove the tape while the caulk is still damp so you can make any corrections as needed.

Pull the tape slowly away. Be careful not to get the wet caulk from the tape onto you or anything else.


You now have perfect caulk lines that blend perfectly with your grout!


Here's the current status of our kitchen (lacks window seal, trim, chimney hood, crown moulding, caulk against cabinets, receptacle covers, drawer pulls and paint touch-ups):


Tuesday, June 23, 2015

Installing subway tile (part 1)

The kitchen is progressing! We now have my dream backsplash: white 3x6 subway tile with light gray grout. This tutorial will be for the installation of the tile. I'll do a separate post for grouting. 

Supplies needed: 

- mastic (I used TEC Type-1 Mastic $13.98 for 1 gallon. We used 1 gallon and 1 quart for the whole project).
- notched trowel
- level
- tile spacers (I used 1/8" TAVY spacers $4.98 for 100. You don't have to use spacers. Most subway tiles have built in spacers. I opted for a larger gap).
- subway tiles (I used 3x6 American Olean white ceramic non-beveled. 22¢ each)
- pencil
- measuring tape
- sheetrock mud pan
- wet saw (I'll get to that later)
- flat head screw driver 
- Sharpie® to mark your cuts
- trim pieces (I opted for a metal trim instead of tile. One piece covered me for the whole project).
- damp rag


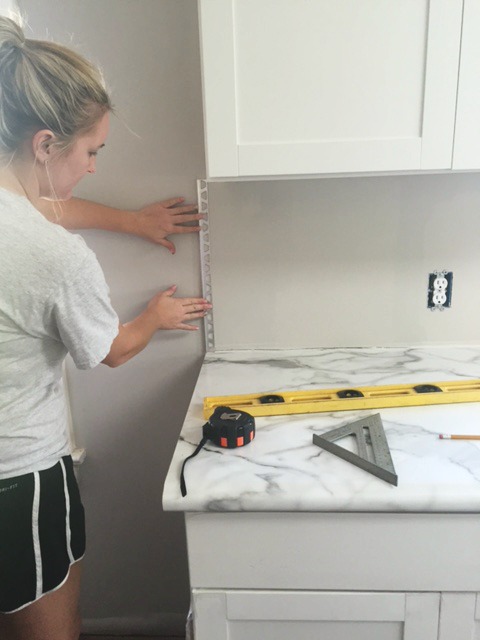
1. Find a starting point. Since I was new to tiling, I opted for the smaller wall first. I started from the corner on the sink wall. I worked off the counter as my base line. Make sure your counter is level if you are going to do it this way. Then, I marked the vertical line using the level. *Be sure to check level throughout the process. You don't want to start going downhill or uphill. It will be noticeable.

2. After I had my vertical level line marked, I measured the height for my vertical trim. Using a handheld grinder, we cut the trim to fit, smoothing any sharp edges. 


3. Scoop a good sized dollop of mastic into your pan. Be sure to seal your bucket of mastic as soon as possible. You'd be surprised how fast that stuff dries out!

4. Using your trowel, get a generous scoop of mastic from the pan.  Apply the mastic to the wall being sure to leave the trowel indention. I found it easiest to hold the trowel at a 45° angle. **Only apply enough mastic for 2 or 3 tiles. Work in a very small area to keep your mastic moist.**

I only applied enough mastic to stick the trim to first. Once the trim was glued and level, I applied the mastic over the lip. Only the thin metal edge will be visible. The tile sandwiches the trim to the wall, securing it.


5. After the mastic is on the wall, "back butter" your tile. I'm not sure if that is the correct terminology, but in the south, we know how to butter bread. :)  Put a generous amount, but not so much that it will squeeze out around the edges.


6. Press the tile firmly to the mastic on the wall. Use your tile spacers as you apply each tile. Don't apply a few and go back to wiggle the spacers in. We did this and moving the tiles broke the "bond" and they fell off.... YIKES! Lesson learned. *If mastic seeps out around the edges, use your flat head screwdriver to remove it. Any mastic in-between the tiles will affect your grout.*


Apply a spacer in each joint to keep the tiles evenly spaced.


7. Measure the tiles to cut. Take into consideration your spacers. Mark with a Sharpie® or other permanent marker.


**As I stated in the "supplies needed" section, you need a wet saw. Lowe's told me when I was purchasing my tiles that if we marked our tiles, they would cut with their wet saw for 25¢ per cut. We marked our tiles and took them to Lowe's. What the guy failed to tell me is they only do 10 cuts per trip... ?!? I sweet talked him into cutting the tiles we brought since we live 20 minutes away. I think we had 11 tiles, but way more than 10 cuts. We knew that we would need more cuts on the other wall, so Dad had a brilliant idea. Here's your Redneck 101 lesson for today, but it's genius! We bought a diamond blade (DEWALT® 4" Wet or Dry Continuous Diamond Circular Saw Blade $24.99) for the grinder (similar here) and a spray bottle. I squirted (a lot) of water on the blade of the saw while Dad cut. PERFECTION! We should probably patent that...Redneck Wet Saw. :)  So glad we did because we had to re-cut everything the Lowe's associate had cut for us...grrrr


Back to the tutorial... I continued to install what I could while the tiles were being cut. Yes, I did tile vertically before the horizontal was complete. I wouldn't recommend that, but it was such a small area that it didn't affect anything. If you tile vertically before your horizontal is complete, it can cause sagging tiles since they have nothing to rest on.


8. Allow 24 hours for the mastic to dry. The mastic must dry before you remove the spacers and before you can grout. 

Here is the sink wall waiting on grout:


If you do not have a counter top to work off of, screw a piece of wood as your baseline. (Make sure it is level). We had to do this on the stove wall (you can see it in the photo below). The vertical line we worked from was center of the stove/hood. We made sure all of our tiles were center with that line from the bottom all the way to the ceiling.

We had to rework some of the wiring for the stove hood. We also removed a rectangle of the sheetrock to install a horizontal stud for the hood. We put the sheetrock back and put the screws where they would need to be for the hood. We determined it would be easiest to cut and tile around the screws then trying to drill through the tile.


Here is the stove wall tiled and waiting on grout. 


Stay tuned for Installing Subway Tile Part 2: Grout!!


Thursday, June 11, 2015

New couch

Well, as you may recall in my previous living room photos, I had a blue couch with little rosettes on the fabric. 


I mentioned that I was in the process of reupholstering a tufted sofa in dropcloth fabric.... Well, I'm still in the process. Along with an armchair, two side chairs, a china cabinet... whew. My list is growing and my time is shrinking. The renovation definitely takes priority. Not that I cook (ha!), but for the sanity of my husband, he is ready for some organization and normalization in the kitchen and dining room. And I am ready to put everything back in its place so I can decorate!! :)

Anywho, as I was saying, it doesn't look like any of my furniture projects are going to get done at this moment until we can finish the renovation. So...I bit the bullet and bought a couch (one from a store)! I am so excited. I think this is my first piece of furniture that I have purchased that doesn't need attention or that didn't come from a second-hand store or craigslist. Drew is more excited than I am that I bought a "project-less" piece. 

It's so comfy and pretty and definitely worth the wait. It is a linen blend material with down cushions and silver nail-head trim. SWOON! It's my dream sofa and fits perfectly with my style. Not only is she a beauty, it's also very comfy and the cushion covers can be removed and washed! So, yes, I splurged, but it is a timeless piece that is functional and well-built. No regrets!

Here she is still at the store (PS Faulk in Enterprise, AL):


And here she now sits in my living room:


I'm so in love! I can't wait to finish up everything to show you more progress and decor! Stay tuned!


Monday, May 25, 2015

Positive encouragement

Hi all! I just wanted to share some things that the Lord has really placed on my heart. I visited my younger brother's church on Mother's Day. He is a middle school pastor at Richland Creek Community Church in Raleigh, NC. As an older sister, I am overwhelmed every time I see my baby brother and his sweet wife giving fully of themselves to further Christ's kingdom. Raleigh, NC is a 12 hour trip...one way. It is very hard on their growing family to be away from family.  BUT, Evan and Elizabeth never complain. They only praise Jesus's glory and blessings that He has given to them. Their ministry in in itself overcomes me every time I think of them. I only wish I could be as selfless as they are.

(from left to right: Evan, Elizabeth, Ella Cate being held by Mom, Larlee Beth being held by me, and Drew)


As I was visiting Richland Creek and awaiting the baby dedication of the newest Kohen, Ella Cate, I was reminded and humbled about God's grace. I am not one to indulge in my personal life to anyone other than family, but I have been led to open up and share. That maybe someone going through a similar situation can be encouraged and to seek Him in their time of need. Drew and I have been married for almost 6 years. 3.5 of those years have been filled with sadness of not being able to grow our own family. Mother's Day and Father's Day are always a sensitive time for us. When we were first diagnosed as "infertility-unknown," we were crushed, angry, confused, and bitter. We allowed this to consume us. My selfishness grew and I became jealous and very angry.  Infertility is a recurring grief that happens every month. To realize the possibility that I may never see a child that has my features is to suffer a loss I never knew or felt or held. I could not deal with the news of pregnancy, especially for those closest to me. As time went on, my eyes were opened to the hurt and awkwardness this caused for people around us. The announcement of a pregnancy, which should be a time of celebration, was marred by the concern for our feelings. I must say that the sentiment is nice, but it shouldn't be about us...ever. I don't want to be the person people talk about or are awkward around.

We turned our sadness over to Jesus and allowed Him to fill the void that once filled our hearts. I won't say that we don't get emotional at times, but we have a hope and a peace that our day will come (even if through adoption). We don't dwell on the negative but rather rejoice for the many blessings that we do have. I am ashamed that I was bitter and angry. My eyes and heart are now open to the realization that God DOES HAVE A PLAN. I'll be honest to say that those are words you do not always want to hear when you are going through a fertility struggle. To hear "your time will come," or "just be patient" or "quit trying and it will happen" only deepen the wound. I know that God has allowed this time for Drew and I to draw nearer to Him and to each other. To see the blessings and rejoice in the positive. I am honored that my God sees us fit to engage in this journey, to be a vessel and a voice to those that remain bitter and angry. John 9:3 says "Neither this man nor his parents sinned," said Jesus, "but this happened so that the works of God might be displayed in him.Our prayer is that the works of God are displayed through our journey. 

My words to the many that are facing this battle: do not dwell in the sadness. You are not alone. Seek encouragement through family, your church family, and most importantly, your spouse. Do not ever blame your spouse during this time. This is a battle you must face together, as a team. Pray together. Have a good cry and pray. Put Christ in the center of your relationship and seek comfort in Him. He is using you for a reason. Stand strong. Next, enjoy the intimate time with your spouse. Don't let the act of "trying" replace the love and intimacy. Lastly, and please do not be saddened by this realization, but understand that He may have a bigger plan that does not include natural conception. You and your spouse have to determine when you "stop trying." Infertility is not only an expensive journey but it is also an emotional one. Know your limit and agree on it. If conception does not occur, DO NOT BE DEFEATED. This does not mean that you aren't good enough to be a parent. There are options such as adoption, foster parenting, or just being the best aunt/uncle in the world!

To the family and friends of those struggling with infertility: Remain positive and encouraging. Be cautious to bring up the issue and to offer encouragement when not sought. Be aware of the encouragement you do offer. It is best not to say "your time will come" or "quit trying and it will happen." The sad reality is that it may not happen. It stings to hear that he/she is trying too hard or not enough. Infertility is diagnosed after several failed attempts to naturally conceive and after extensive (and painful) testing. It isn't something that will happen if we "quit trying." Treat the situation as you would if he/she just lost a loved one. We wouldn't say "your time will come to remarry" or "quit being sad and someone else will come into your life." It's sounds like a good idea at the time, but in reality that isn't much that you can say to help. It doesn't erase the pain. The biggest encouragement and support is to offer your prayers and let them know you are thinking of them.

The writer of this page mirrors much of my own words. Click here to read the article. The only thing that I do not agree with (and everyone is different), but I do not want to be honored on Mother's Day. I am not a mother. I feel that it draws more attention to my struggle and deepens my wound. I look forward to the day that I do get to be honored on that special day. I'll be the one with corsages pinned ALL over my dress and dancing down the aisle at church. ha!

Just remember that infertility is a growing struggle for couples of all ages and walks of life. It does not discriminate. Be cautious when you say "when are you going to start a family?" The very likely reality if a couple doesn't have children is because they can't.

I hope this helps if you are someone struggling with infertility or know someone who is. If you need support, please email me at donaldson.kristi@gmail.com. I will be happy to pray with you and for you. Psalms 91:4, "He shall cover you with His feathers, and under His wings you shall take refuge; His truth shall be your shield and buckler."